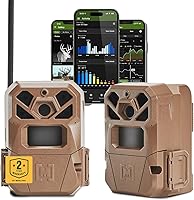
How to Set Up a Cellular Trail Camera
To set up a cellular trail camera, charge the batteries, install the SD card, and run the app's coverage test where you plan to hang it. Power the camera on, aim it with the live view, then choose a data plan before you leave. Most cameras send their first test photo within a few minutes.
On this page (9 sections)
- What do you need before you start a cellular trail camera setup?
- How do you check cell signal at the tree?
- How do you aim a cellular trail camera?
- Which batteries keep a cellular trail camera running?
- How do you choose a data plan and connect the camera?
- How do you mount and lock a trail camera?
- What should you check after the first day?
- How do you keep a cellular trail camera working all season?
- What is the simplest setup routine for a cellular trail camera?
To set up a cellular trail camera, charge the batteries, install the SD card, and test the signal at the exact tree before you mount anything. Power the camera on, run the app's setup, aim it with the live view, then choose a data plan.
Most cameras send a test photo within a few minutes of connecting.
The order matters more than the steps. Testing coverage after you have strapped the camera 10 feet up a tree is the mistake that costs a trip back to the woods.
Do the checks at ground level first, then mount and confirm.
What do you need before you start a cellular trail camera setup?
Gather fresh batteries, an SD card, a charged phone, and the camera's app before you leave the truck. A cable lock and a small tool for tightening the strap save a second trip.
Fresh lithium AA cells matter in cold weather. Alkaline cells lose power fast when the temperature drops, and a camera that dies in week two sends nothing.
Charge or buy batteries the day before you head out.
The SD card stores the full-resolution images while the camera uploads smaller copies. A 32GB card is plenty for most seasons.
Format the card in the camera the first time you use it.
Download the app and create your account at home on WiFi. The Moultrie app handles activation, plans, and settings for its cameras.
Pairing is faster when the app is already installed.
How do you check cell signal at the tree?
Run the app's coverage test or signal meter at the spot where the camera will hang, not at the trailhead. Signal strength varies by a few feet and by height.
Hold the phone and camera at the height and angle you plan to use. Trees, hills, and dense canopy all cut signal.
A camera that reads four bars on open ground can drop to one bar in a hollow.
If the meter is weak, try a different tree within sight of the trail. Small shifts in position often fix coverage.
Keep the lens facing the trail you want to watch while you hunt for a better signal.
The Moultrie Edge 3 connects automatically to the strongest of four major U.S. networks with no SIM card. That removes one setup step, but it doesn't remove the need to test the spot.
If yours needs a SIM, install it before this test. Our guide to cellular trail cameras and how they connect covers carriers and plans in more detail.
How do you aim a cellular trail camera?
Aim the camera with the live view in the app, then fine-tune the height and angle so the detection zone covers the trail. Aim first, then lock the mount down.
Mount the camera about 3 to 4 feet off the ground on a straight tree facing the trail. That height matches a deer's body and catches the animal as it walks past.
Angle it slightly down so the flash reaches the ground in front of the lens.
Use the live view to confirm the frame. Adjust the camera until the trail crosses the middle of the picture and the area in front of the lens is clear of brush that would trigger false photos.
Clear grass and small branches from the field of view. A branch moving in the wind can fill the card with blank shots.
On a food plot or feeder, aim at the edge of the plot rather than the middle so deer are close when they enter the frame.
How does the Moultrie Edge 3 help with aiming?
The Edge 3 has Live Aim, which previews the camera view in real time so you can see what the lens sees before you walk away. Its built-in GPS also maps every camera so you know exactly where it's set.
The camera takes 40MP photos and 1080p HD video, with a low-glow infrared flash for night shots. The 0.5 second trigger and 100 foot detection range suit trails where deer keep moving.
Moultrie AI identifies bucks and sends high-resolution alerts, and the app controls settings and compatible feeders remotely.
Which batteries keep a cellular trail camera running?
Lithium AA batteries are the usual pick for a full season, because they hold power in cold weather. A cellular camera wakes often to send photos, so it drains faster than a camera that only stores images on a card.
Count the cells your camera needs and carry spares. Most take 8 to 12 AA cells.
Cold nights in late season are when alkaline cells fade, right when deer movement picks up.
Energizer says its Ultimate Lithium AA cells hold power for up to 25 years in storage and work from -40F to 140°F. That temperature range covers winter nights in most deer country.
Leak-proof construction protects the camera if a cell sits too long.
Rechargeable packs and solar panels cut battery trips on cameras that support them. The Edge 3 accepts EDGE Series lithium battery packs and solar panels.
Check battery level in the app before a cold snap, not after the camera goes quiet.
How do you choose a data plan and connect the camera?
Pick the smallest monthly plan first and raise it if you need more photos. Most plans count uploaded images and video, and a busy feeder sends far more than a travel corridor.
Moultrie's plans start at 9 dollars.99 a month with no contracts. You can scout year-round or seasonally.
Buy a plan before the camera sends its first photo, because most cameras hold uploads until the plan is active.
Follow the app's activation steps. Power the camera on, let it find the network, and wait for the confirmation.
The first test photo should land in the app within a few minutes. If nothing arrives, recheck the signal meter and the battery level.
Set your photo burst and trigger interval at this point. A short interval fills the card with shots of the same deer.
A longer interval saves data and battery while still covering the trail.
How do you mount and lock a trail camera?
Mount the camera firmly at the height you tested, then lock it to the tree. A camera that shifts in the wind sends tilted photos and false triggers.
Thread the strap through the mount and pull it tight against the trunk. Check for wobble by nudging the housing.
A loose camera moves with every gust and fires at nothing.
A cable lock stops most casual theft. Thread the cable around the trunk and through the camera's security slot or housing, then lock it.
Master Lock's Python cable is 6 ft long and 3/16 in wide, made of braided steel with a vinyl coating.
Trim branches that could scrape the housing. Check the mount after the first week, since straps loosen as the tree moves in weather.
Our comparison of WiFi vs cellular trail cameras explains when a cable lock matters less because the camera sits near the house.
What should you check after the first day?
Review the first batch of photos for aim, false triggers, and signal, then adjust once and leave the camera alone. The first day tells you almost everything.
Look at the frame. If the trail sits at the edge of the picture, nudge the camera.
If you see dozens of shots of moving grass, clear the brush in front of the lens.
Check the battery level and the upload count in the app. A fast drain points to weak cells or a signal that keeps the camera hunting for a tower.
Move it to a stronger spot if the meter was borderline.
Confirm the timestamps are right. A wrong clock makes it hard to pattern deer movement.
Most apps sync the time when the camera connects.
Our review of the Moultrie Edge 2 shows how the app handles alerts and settings on the earlier model. Before you commit to a monthly plan, read whether cellular trail cameras are worth it for the cost side.
How do you keep a cellular trail camera working all season?
Check the app every few days and fix small problems before they cost you a week of photos. Signal, battery, and aim are the three things that fail.
Top up batteries before a cold front. Clean the lens and the flash window when you visit.
Check that the strap is still tight and the cable lock is intact.
Update the trigger interval with the season. A camera on a scrape in November needs a short interval, while a summer food plot camera can run longer.
Keep the plan active through the season you care about.
If photos stop, test the signal first, then the batteries, then the SD card. A camera with no signal still saves photos to the card, so you can collect them when you next visit.
When you're ready to add a second camera, the Moultrie Edge 3 setup steps repeat in the same app.
What is the simplest setup routine for a cellular trail camera?
The simplest routine is test the signal, aim with the live view, pick a plan, mount, and lock. Do the tests at the tree, in the order above, and the camera usually sends its first photo the same day.
Choose the Moultrie Edge 3 if you want Live Aim and automatic multi-carrier connection in one camera. Add Energizer Ultimate Lithium cells for cold weather and a Master Lock Python cable to keep the camera in place.
Skip the cable lock if the camera sits behind a locked gate on private land. Skip lithium cells only if you plan to swap batteries often and the weather stays mild.
Run the coverage test again any time you move the camera, since a new tree means a new signal path. That habit is the whole answer to how to set up a cellular trail camera so it keeps sending photos.
Frequently asked questions
Do I need a SIM card for a cellular trail camera?
It depends on the model. The Moultrie Edge 3 auto-connects to the strongest of four major U.S. networks with no SIM card and no manual setup.
Check whether your camera needs a SIM before you buy a data plan.
Why won't my cellular trail camera send photos?
Start with signal, then power. Run the app's coverage test at the exact spot, make sure the batteries are fresh, and confirm the SD card is seated.
A camera that shows bars on the ground can lose them at head height, so test where the camera will actually hang.
How long do batteries last in a cellular trail camera?
It depends on how many photos the camera sends. Lithium AA cells handle cold weather better than alkaline and are the usual choice for a full season.
Rechargeable packs or a solar panel cut trips to swap batteries, and many apps show battery level remotely.
Can I set up a cellular trail camera without cell service?
Yes, but it won't send photos. Many cameras, including the Moultrie Edge 3, allow in-field changes through offline settings when there is no signal.
Aim it carefully at home first, because you can't adjust it remotely without a connection.
What data plan do I need for a trail camera?
Start with the smallest monthly plan and raise it if you get more photos than you expected. Moultrie's plans start at 9 dollars.99 with no contract.
A camera in a busy food plot sends far more images than one on a travel corridor.